RecyclerView란?
대량의 데이터set을 효율적으로 표시할 수 있는 View입니다. 예를 들어 카카오톡의 채팅 대화방처럼 특정 객체들을 리스트 형태로 나열하는데 RecyclerView를 활용할 수 있습니다.
기본적으로 제공되는 ListView가 있지만, RecyclerView는 커스터마이징과 효율성 측면에서 장점이 더 많은 View라고 볼 수 있습니다.
RecyclerView의 재활용성

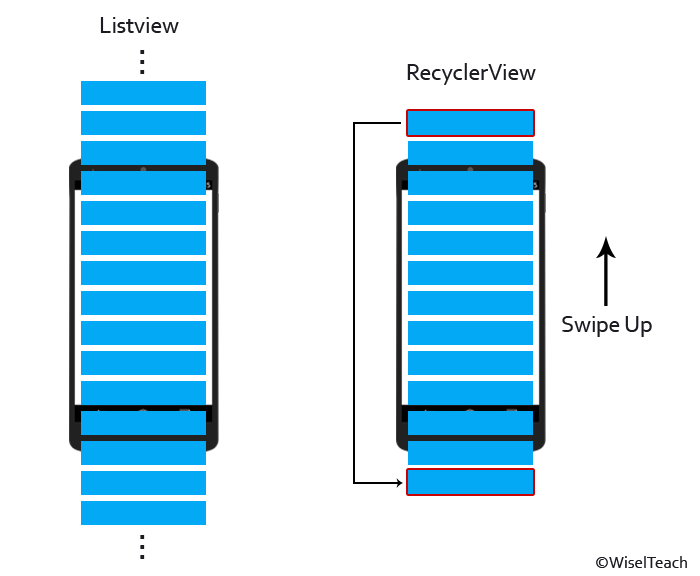
위의 그림을 보면, ListView와 다르게 RecylcerView는 아래로 스크롤 할 때, 맨 위의 객체를 맨 아래로 이동시켜 재활용하는 것을 확인할 수 있습니다. 물론, 객체 자체만을 재활용하는 것으로 객체에 담겨지는 데이터는 새로 갱신하여 사용합니다.
만약 맨 처음 화면에 보여질 View가 10개라면? 실제 데이터가 수천, 수백개라도 오로지 10개의 View 객체만 생성하여 재사용하는 것입니다.
반면에, ListView는 아래로 스크롤 할 때, 맨 위의 객체를 삭제하고 아랫 부분에 객체를 새로 생성하여 사용합니다. 만약 스크롤을 위아래로 반복한다면 수백, 수천개의 View 객체가 생성/삭제가 반복됩니다.
ViewHolder
위에서 설명했듯이, 스크롤을 내릴 때, 사라지게될 맨 위의 객체를 맨 아래로 이동하여 재활용합니다. 즉, 10개의 View 객체만 계속해서 위에서 아래로 이동하면서 재사용되는 것입니다. 10개의 View 객체들은 언제든지 텍스트나 이미지를 변경할 수 있습니다.
따라서 맨 처음 10개의 View객체를 기억하고 있을(홀딩) 객체가 필요한데 이것이 바로 ViewHolder입니다.

public static class LocationViewHolder extends RecyclerView.ViewHolder {
    CardView cardView;
    TextView address;

    public LocationViewHolder(@NonNull View itemView) {
        super(itemView);

        cardView = itemView.findViewById(R.id.cardView);
        address = itemView.findViewById(R.id.address);
    }
}
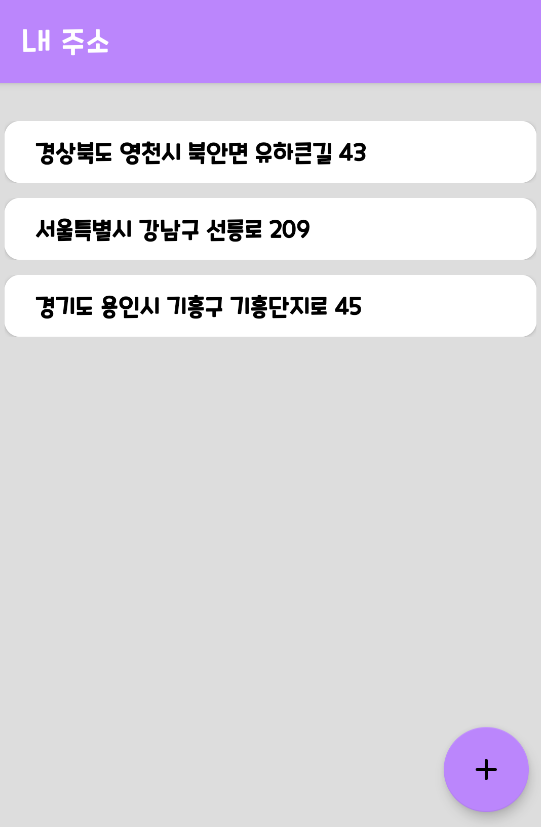
위 그림은 주소를 RecylcerView로 구현한 모습입니다. 각 TextView는 address를 저장하고 있습니다.
즉, address 변수에 다른 주소를 저장하며 모든 주소 목록을 나열할 것입니다. 그러나, 오직 10개 내외의 ViewHolder 객체를 만들어서 계속 재사용할 것입니다. 위 코드를 보면 LocationViewHolder가 TextView를 가지고 있음을 알아야합니다. (CardView는 TextView를 감싸고있는 것으로 그림에서는 하얀 테두리입니다.)
Adapter와 LayoutManager
RecyclerView를 사용하려면 2가지가 필수입니다.
Adapter는 수 백개의 주소 이름이 담긴 List를 RecylcerView에 바인딩(Binding)시켜주기 위한 사전 작업이 이루어지는 객체입니다. (직접 작성해서 RecyclerView에 적용시킵니다.)
LayoutManager는 많은 역할을 하지만, 여기서는 간단하게 스크롤을 위아래로 할지, 좌우로 할지 결정하는 역할만 고려합니다.
@Override
protected void onCreate(@Nullable Bundle savedInstanceState) {
    super.onCreate(savedInstanceState);
    setContentView(R.layout.location_view);

    recyclerView = findViewById(R.id.recyclerView);
    recyclerView.setLayoutManager(new LinearLayoutManager(this));

    locationAdapter = new LocationAdapter(this, this, locationList);
    recyclerView.setAdapter(locationAdapter);
}
LocationAdapter
Adapter의 코드를 먼저 확인해보겠습니다.
public class LocationAdapter extends RecyclerView.Adapter<LocationAdapter.LocationViewHolder> {
    Context context;
    Activity activity;
    List<Location> locationList;

    LocationAdapter(Context context, Activity activity, ArrayList locationList) {
        this.context = context;
        this.activity = activity;
        this.locationList = locationList;
    }

    @NonNull
    @Override
    public LocationAdapter.LocationViewHolder onCreateViewHolder(@NonNull ViewGroup parent, int viewType) {
        LayoutInflater layoutInflater = LayoutInflater.from(parent.getContext());
        View view = layoutInflater.inflate(R.layout.location_item, parent, false);
        return new LocationAdapter.LocationViewHolder(view);
    }

    @Override
    public void onBindViewHolder(@NonNull LocationAdapter.LocationViewHolder holder, int position) {
        Location location = locationList.get(position);
        String address = location.getStreetAddress();
        holder.address.setText(address);
    }

    @Override
    public int getItemCount() {
        return locationList.size();
    }

    public static class LocationViewHolder extends RecyclerView.ViewHolder {

        CardView cardView;
        TextView address;

        public LocationViewHolder(@NonNull View itemView) {
            super(itemView);

            cardView = itemView.findViewById(R.id.cardView);
            address = itemView.findViewById(R.id.address);
        }
    }
}
먼저 LocationAdapter의 생성자로 주소 데이터가 담겨있는 LocationList를 받습니다. 그리고 RecylcerView.Adapter를 상속받는데 이때, 제네릭 타입으로는 직접 생성한 LocationViewHolder를 넣어줍니다.
getItemCount
Adapter생성시, 가장 먼저 호출되는 함수입니다. 여기서는 우리가 뿌려줄 데이터의 전체 길이를 리턴합니다. 만약 이를 0으로 return하면 Adapter는 보여줄 데이터가 없다고 판단합니다. 그래서 데이터베이스나 List에 데이터가 있더라도 View에 표시되지 않습니다.
@Override
public int getItemCount() {
    return locationList.size();
}
onCreateViewHolder
getItemCount 다음으로 호출되는 함수입니다. 이름에서 알 수 있듯이 ViewHolder가 생성되는 함수로 ViewHolder객체를 만들어주면 됩니다.
@NonNull
@Override
public LocationAdapter.LocationViewHolder onCreateViewHolder(@NonNull ViewGroup parent, int viewType) {
    LayoutInflater layoutInflater = LayoutInflater.from(parent.getContext());
    View view = layoutInflater.inflate(R.layout.location_item, parent, false);
    return new LocationAdapter.LocationViewHolder(view);
}
맨 위에서 언급했듯이 전체 리스트 목록이 딱 10개라면, 위 아래 버퍼를 생각해서 13~15개 정도 여유있게 View 객체가 생성됩니다. 정확하게 말하자면 View 객체를 담고 있는 ViewHolder가 생성되는 것입니다. 그래서 onCreateViewHolder 함수는 딱 13~15번 정도만 호출되고 더 이상 호출되지 않습니다.
return값을 보면 LocationViewHolder의 생성자에 view객체를 넘겨주는데, 이 객체는 위의 그림에서 본 한 개의 주소 목록이 디자인 되어있는 레이아웃입니다. 즉, ViewHolder는 레이아웃을 인자로 받아서 기억하고 있는 것입니다. 이제 계속해서 재사용되는 ViewHolder(레이아웃)들에 데이터를 바인딩(Binding)하는 작업만 남았습니다.
onBindViewHolder
지금까지 생성된 ViewHolder에 데이터를 바인딩해주는 함수입니다.
예를 들어, 데이터가 스크롤 되어서 맨 위에 있던 ViewHolder 객체가 맨 아래로 이동한다면, 그 레이아웃은 재활용하되, 데이터는 새롭게 바인딩되는 것입니다.
@Override
public void onBindViewHolder(@NonNull LocationAdapter.LocationViewHolder holder, int position) {
    Location location = locationList.get(position);
    String address = location.getStreetAddress();
}
이 때, 새로 보여질 데이터의 인덱스는 position이라는 이름으로 사용 가능합니다. 즉, 아래에서 새롭게 올라오는 데이터가 리스트의 20번째 데이터라면 position은 20이 들어오게 됩니다.
바로 위에서 언급한 onCreateViewHolder는 ViewHolder객체를 만들기 위해 13~15번만 호출됩니다. 하지만, onBindViewHolder는 스크롤을 통해 데이터가 새롭게 바인딩될 때마다 호출됩니다. 스크롤을 무한정 돌린다면, onBindViewHolder도 무한정 호출되는 것입니다.
다만, 우리가 실제 사용하는 View객체는 오직 13~15개만 있는 것입니다.
Result
RecyclerView에 많은 객체를 생성했을 때의 결과는 다음과 같습니다.
실제로는 사진 아래 더 많은 데이터가 있습니다. 위에서 예시로 든 숫자들과는 조금 다르지만, 모바일 화면과 한 개의 데이터가 차지하는 공간에 따라서 처음에 생성되는 ViewHolder의 개수는 얼마든지 바뀔 수 있습니다.

'Android > study_til' 카테고리의 다른 글
| [AOS] Room + ViewModel + LiveData + RecyclerView (1) (0) | 2021.06.28 |
|---|---|
| [AOS] ROOM이란? (2) | 2021.06.24 |
| [AOS] Fragment의 생명 주기 (0) | 2021.05.23 |
| 아키텍쳐 디자인 패턴 - MVP란? (0) | 2021.05.21 |
| 아키텍처 디자인 패턴 - MVC란? (1) | 2021.05.21 |